
If you’re thinking about getting a big lawn set up with sod, there are a few things to keep in mind to make sure the job goes smoothly. Sod installation isn’t just about rolling out grass and watering it. There’s more to it, especially when dealing with larger areas. The way you handle soil preparation, choosing the right sod type, and laying it correctly can either set you up for success or lead to problems later.
Why Sod?
Before jumping into sod installation, it’s important to know why it might be the best choice for large lawns. For one, it gives instant results. You don’t have to wait for weeks or months for grass seed to grow. It also helps prevent soil erosion and can be laid almost any time of the year, as long as the ground isn’t frozen. Plus, sod establishes itself faster compared to seeded lawns, meaning your yard is usable sooner.
Step 1: Preparing the Ground
The most important part of installing sod is the prep work. You can’t just throw it down on any old dirt and expect it to thrive. You need to ensure that the soil is in good condition for the grass to take root. This means removing old grass, weeds, and rocks. One of the most common mistakes during sod installation is neglecting to test the soil before laying the sod. It’s important to check for the right pH levels. Most types of sod prefer a pH between 6.0 and 7.5. If your soil falls outside of this range, you may need to add lime or sulfur to correct it.
Use a rototiller to break up compacted soil. It will help the roots penetrate more easily. When you till, mix in some compost or organic matter to improve the soil structure. You want at least 6 inches of good soil for the sod to establish a strong root system. If your soil is sandy or heavy clay, consider mixing in topsoil.
Step 2: Measuring the Area
Measuring your lawn correctly helps you avoid buying too much or too little sod. Measure the length and width of the area and multiply to get the square footage. It’s recommended to add an extra 5-10% to your order, as some sod may get damaged during transportation or trimming. A lot of people overlook the corners and odd-shaped parts of their lawn, but these spots will need special attention when cutting sod.
Tip: Order sod from a local farm, so it doesn’t sit too long after harvesting. The fresher it is, the better the results. If the sod is more than 24 hours old, it might not take well to the soil.
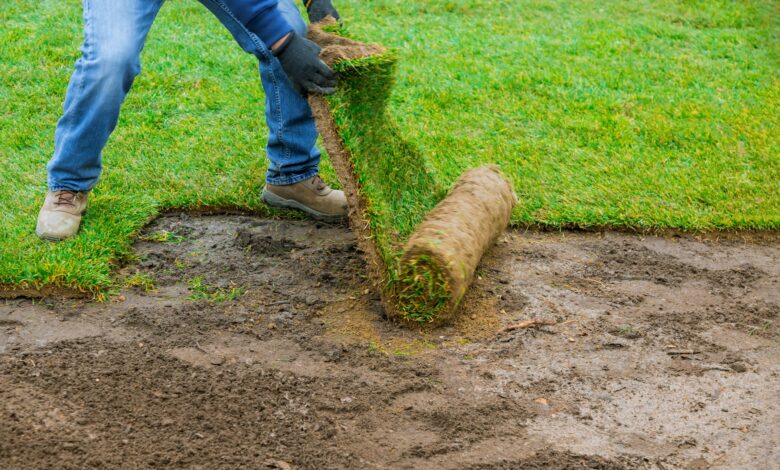
Step 3: Laying Sod Efficiently
The first thing you want to do when laying sod is to ensure it’s lined up properly. Always start laying sod along a straight edge, like a driveway or a fence line. Never stretch it to cover gaps, as that could leave spaces where weeds might sprout up. Use a sharp knife to trim pieces to fit corners and curves.
A pro tip many miss is to stagger the seams like you would when laying bricks. This way, there are no long continuous seams that might dry out and cause gaps. Gently press the edges together without overlapping. Once laid, immediately press the sod into the soil using a roller. This eliminates air pockets, ensuring good contact between the sod and soil.
Step 4: Watering Right
Watering is where a lot of people slip up. The first two weeks after sod installation are crucial. During this period, water the sod deeply every day, preferably early in the morning when the temperatures are cooler. The water should soak through the sod and into the top few inches of soil to encourage root growth.
Don’t overwater though, as soggy sod is prone to disease. After the first two weeks, start reducing the watering to every other day, and gradually taper off. By the time you reach the fourth or fifth week, you can move to a regular watering schedule—about 1 to 1.5 inches of water per week depending on your climate.
Step 5: When to Mow
When your sod starts rooting, you’ll notice it becomes harder to pull up. This is a good sign that it’s beginning to establish. Wait until the grass reaches 3 inches in height before mowing. Keep your mower blades sharp, and never cut more than one-third of the grass height at a time. Dull blades can tear the grass and cause stress to the plant.
For the first few mowings, set the blades higher than usual. This helps keep the grass strong while it’s still establishing roots. Once it’s well-rooted, you can mow it at your preferred height, which for most turfgrass types, is about 2 to 3 inches.
Best Time of Year for Sod Installation
While you can lay sod any time of year (except winter when the ground is frozen), the best times are typically in spring or fall. During these seasons, temperatures are cooler and rainfall is more consistent, which makes it easier for the sod to establish itself. Avoid installing sod in extreme heat as the grass will stress out and need extra water.
The specific type of sod you choose can also affect the timing. Cool-season grasses like Kentucky bluegrass or fescue are best laid in cooler months, while warm-season grasses like Bermuda or Zoysia do well in late spring to early summer when temperatures are warmer.
Types of Sod for Large Lawns
The type of sod you choose depends on your location and the specific conditions of your lawn. For example, if your yard gets a lot of sun, Bermuda grass is a good choice, as it thrives in hot, sunny areas. If you have a lot of shade, fescue is a better option because it can tolerate low light.
Here are a few popular sod types for large lawns:
- Kentucky bluegrass: Known for its rich green color, it’s a popular choice in northern regions.
- Tall fescue: Ideal for cool climates and can withstand heavy foot traffic.
- Zoysia: Great for warmer climates, it is drought-resistant and requires less mowing.
- Bermuda grass: Perfect for hot, sunny areas and widely used in southern lawns.
Sod Care Post-Installation
After the sod has been installed and rooted, there are a few ongoing care tasks to keep in mind. Fertilizing your lawn is essential for maintaining its health. Apply a fertilizer specifically formulated for sod about 6 weeks after installation. Follow the instructions on the packaging for the correct amount. Too much can burn the grass, while too little won’t give it the nutrients it needs.
Additionally, aerating your lawn every 1-2 years helps maintain healthy soil structure, improving root development and allowing water to penetrate deeper.
Conclusion
Sod installation can be a straightforward process if you do your homework and follow the right steps. Prepping the soil, choosing the right sod type, and giving it the proper aftercare are the key factors that will determine whether your lawn thrives or struggles. Large lawns require careful planning, but the reward of a lush, green yard is well worth the effort. Remember, fresh sod is an investment, and taking the time to install it correctly will ensure you enjoy it for years to come.